Waterproofing starts at the roof and the grade. Not in the basement.
A 2,000-square-foot roof sheds approximately 1,250 gallons of water during a single 1-inch rain event. If your downspouts dump that volume within three feet of the foundation, or if your yard slopes toward the house instead of away from it, you are actively flooding your own basement. No interior system can outrun a surface-water problem.
Before we quote anything that involves cutting concrete, we look at four things:
- Gutters and downspouts. Are they clear, are they connected, do they extend 5 to 10 feet from the foundation?
- Yard grade. Industry standard is a minimum 2% slope (6″ drop over the first 10 feet) away from the foundation. Most older Twin Cities lots have been re-graded to flat or negative slope by decades of landscaping.
- Sump pump status. Working, sized correctly, with a backup?
- Existing drain tile. Is it there, is it functional, is it silted?
If those four are wrong, a $20,000 interior system is treating the symptom. Sometimes the right answer is a downspout extension and a grading correction first. We'll tell you when that's the case.
Clay bowl, hydrostatic pressure, and why the cove joint is the weak link.
When your basement was excavated, the contractor backfilled the hole with looser, more permeable soil than the undisturbed clay-content till around it. That backfill ring is the clay bowl. Water entering it from rain or snowmelt cannot drain horizontally because the surrounding native till is denser and less permeable. The water sits in the backfill trench and pressurizes the wall.
The force on your wall is straight fluid mechanics:
P = ρ · g · h
Pressure equals fluid density times gravity times depth. Water weighs about 62.4 pounds per cubic foot. At a basement footing under 10 feet of saturated soil, that math produces roughly 600 pounds per square footof pressure pushing against your wall and floor. Multiply that across a typical basement wall surface and you're talking tens of thousands of pounds of force.
That pressure drives water through every available path: microscopic pores in the concrete, hairline cracks, mortar joints in block walls, and, almost always, the cove joint, the seam where the basement floor slab meets the wall. The cove joint is not poured monolithically. It is the single weakest point in nearly every basement. When water shows up on the floor “along the edge of the wall,” you're looking at hydrostatic pressure breaching the cove joint.
How interior drain tile actually relieves the pressure.
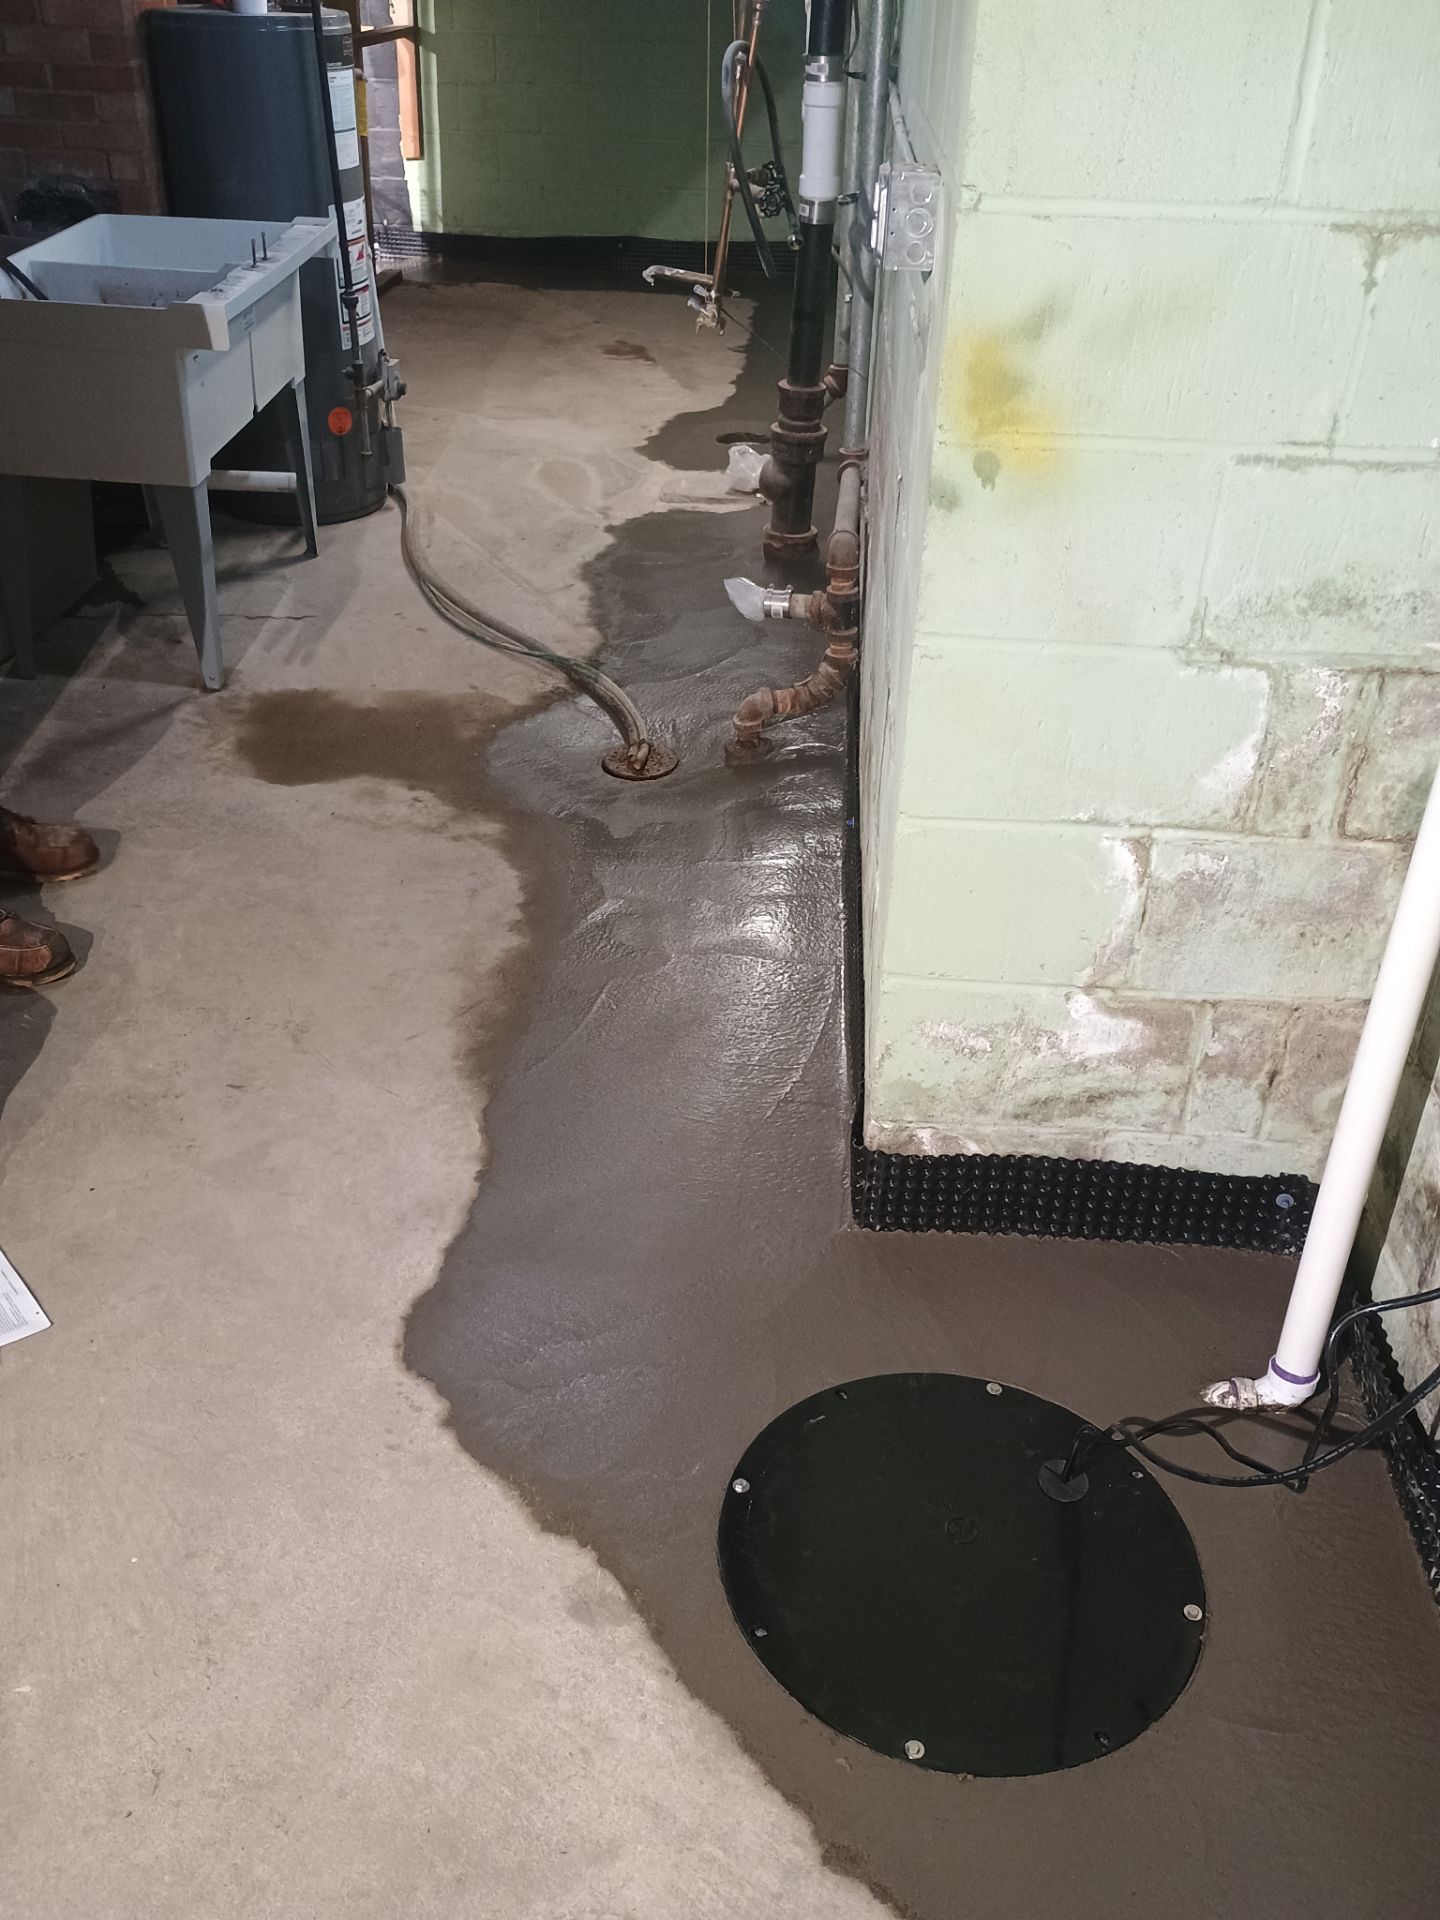
A real interior drain tile system creates a continuous void at the lowest point of the foundation, at footing elevation, below the slab. The slab is cut back 12 to 16 inches from the wall around the entire perimeter. A trench is excavated to the bottom of the footing. A 4-inch corrugated perforated drain tile is placed in clean drainage gravel, pitched to a sump basin, and the slab is re-poured over it.
What that physically does to the groundwater under your house is establish a drawdown curve: a cone-shaped depression in the local water table where water flows preferentially into the perforated pipe. Hydrostatic pressure at the cove joint drops because the pipe is now sitting below the slab elevation and intercepting water before it can reach it. The wall and slab stop being the path of least resistance. The pipe is.
Two critical details that get cut by lazy installers:
- The pipe must be at footing depth. Not above it. Not at slab level. Pressure relief only works if the void is the lowest point.
- Clean drainage gravel, not concrete chips or pea gravel. The wrong aggregate silts up the system in five years.
Interior vs exterior, and when each one is the right call.
| Interior drain tile | Exterior drain tile | |
|---|---|---|
| Method | Cut and re-pour slab perimeter, install pipe below footing depth | Excavate 7-10 ft trench around foundation perimeter |
| Timeline | 1-3 days | 1-3 weeks |
| Landscape impact | None outside | Decks, gardens, A/C condenser, sod all removed |
| Typical cost | $8,000 - $18,000 (most jobs $10K-$14K) | $20,000 - $120,000+ |
| Best for | Existing homes with chronic seepage | New construction, severe bowing walls, exterior wall failure |
Exterior drain tile is mechanically superior in theory, the water never enters the structure at all. Plenty of contractors install it, and on new construction or a wall with severe exterior failure, it's the right call. But for an existing home with chronic seepage, the disruption rarely pencils out for the homeowner. Interior delivers equivalent dryness without removing your deck, your gardens, or three weeks of your life.
What we install and why.
- •4″ corrugated perforated drain tile at footing depth, pitched 1% to the sump
- •Washed 3/4″ drainage gravel in a geotextile fabric envelope
- •Vapor barrier wall membrane that routes water into the system, not the room
- •Modern sealed sump basin + Zoeller M53 (1/3 HP) or M98 (1/2 HP) cast-iron pump
- •Zoeller Aquanot 508 battery backup on a maintenance-free AGM battery
- •Lifetime transferable warranty, moves with the deed
- •Top-of-footer or on-slab plastic channel systems
- •Concrete chips, pea gravel, or whatever was on the truck
- •Plastic-housing box-store pumps or pedestal pumps in primary duty
- •Promises that hydrostatic pressure goes away when it doesn't
- •Warranty terms that void when the home changes hands
A WPNE interior drain tile system is below the slab, at footing depth, with:
- 4-inch corrugated perforated drain tile, pitched at a minimum 1% slope toward the sump basin. Corrugated wall geometry resists the crush load from re-poured concrete above while keeping the perforations open.
- Washed 3/4″ drainage gravel packed around the pipe. Not chips, not pea gravel, not whatever was on the truck.
- Geotextile fabric wrap to keep fine silt out of the gravel envelope.
- Wall-to-slab vapor management, a polyethylene vapor barrier that ties into the new slab and routes any water that comes through the wall into the system rather than into the room.
- Modern sump basin and Zoeller cast-iron pump, an M53 1/3 HP for most installs, an M98 1/2 HP for heavier-flow situations. See our sump pump page for the engineering reasoning.
- Zoeller Aquanot 508 battery backup on a maintenance-free AGM battery, so a power outage during a spring rain doesn't leave you with a basement of water.
Lifetime transferable warranty. The transferable part matters because most failing systems in this region were installed by companies that don't honor warranties when houses change hands. Ours moves with the deed.
Where to start, and where it's worth investigating first.
A full interior drain tile system tends to be the right opening move when:
- Water shows up along the perimeter of the basement floor in multiple spots, classic cove-joint failure
- The home is 50+ years old and has never had a drainage system installed
- The existing drain tile is silted, crushed, or disconnected from the sump (we can scope this)
- You have efflorescence (white crystalline deposits) on the wall and water on the floor, that's active pressure-driven migration
- You've already done the surface-water work and the leak persists
It's worth investigating these issues first, they're obvious contributors that often need attention regardless, and depending on your goals for the space, addressing them can save thousands or extend the time before a full system is necessary:
- Downspouts dumping water within 3 feet of the foundation
- Yard grade that slopes toward the house instead of away from it
- An original sump pump that has never been serviced or replaced
- A leak in a single, isolated spot, often a cracked wall or window-well failure that can be addressed without a full perimeter system
None of these rule out a future system, they're cheaper places to start when they're obvious contributors. We'll walk through what the diagnosis shows and lay out the options, including how each one connects to your long-term plans for the basement.